
Just 1 more week!
Are you sharpening your little Dresden skills???

I recommend that you prep your fabrics
like I mentioned a couple of weeks ago.
In case you’re just now joining us,
that means spraying & ironing them with Mary Ellen’s Best Press.
I also mentioned for those of you that are using the same
Circulus & Lollies Sweet fabric collection like I used,
to cut 3″ strips of each of the stripe fabrics & hang
them like I did on these adorable little hangers so you can see them all at once.
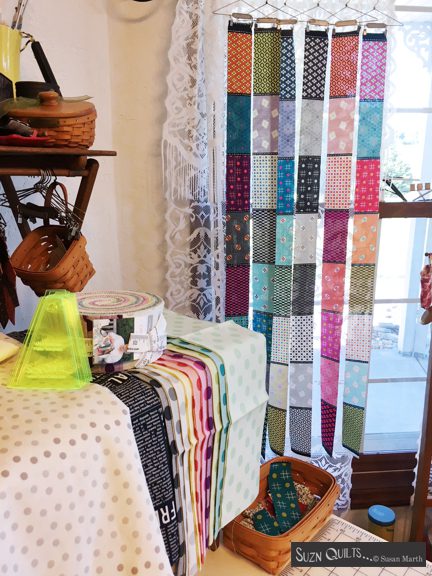
Those 3″ strips of the stripe fabrics
can be used for the border.
The finished quilt is 62″ x 62″.
You’ll need a bit more than 6 strips for the border.
Do you see the one strip that is all black & gray stripes?
I didn’t want to use that one in the border.
If you don’t want to use that one either,
you’ll want to cut another strip
to use in its place as well.
(7 strips total)
Thanks Heather for reminding me to note that to everyone here!
I suggest hanging the extra strips on a hanger too
so you don’t accidentally use them before you get to the border!
Am I the only one that in a few weeks would wonder…
hmm… why did I cut this? & then use it for another part of the quilt???
Lol… NOT!
My memory stinks, so any little trick I can use to
remind myself of something I better use it…… NOW!!!
Another prep step you can do now:
(Circulus & Lollies Sweet users)
cut all of those stripe fabrics apart on the black & white or blue & white lines that separate the stripes.

Aside from the border strips I didn’t use any of the stripe prints more than 1 print at a time.
So, I cut them apart to make them more convenient to use.
But hey, it’s your quilt!
Do your own thing!
In case you already cut all of the stripes apart BEFORE cutting off enough 3″ strips for your border,
contact me & I can probably help you with that!
Aside from prepping your fabrics, please read in Dresden Quilt Workshop:
- Perfect Tools for Perfect Little Petals, starting page 9
- Mini Classroom, starting page 12
- Tiny & Mini Dresden Plate Assembly Techniques, starting page 16
This will help you to jump right in next week when we start cutting & sewing.
Learning how & why I do what I do for perfect little Dresden plates will help you to have similar results!
Send me an email if you have any questions.
SuznQuilts@aol.com
Just Keep Sewing…
Susan
