A Quilt Along, My Life

1-A-Day, 3″ Blocks –Pinwheel

  Pinwheel Block

Super easy block today.

Had lots more fun going through my scrap basket!

 ~~~~~~~~~~~~~~~~~~~~~~~~~~~~~~~~~~~~

Make:

  • 4 half-square triangles 2″ unfinished with 2 fabrics


I used Thangles again & pressed the seams to the red fabrics

because I like the way it helps the seams nest

while I’m assembling the block.

Use your favorite method.

Arrange the hst’s & sew together into a pinwheel block.

I removed the stitches in the seam allowance &

made a little pinwheel in the center to make the block lie nice & flat.

I also made a couple more…

How many will you make?

Just Keep Sewing…

Susan


Show us your blocks at my Sewing With Susan FB Group.

We want to see your progress too!

https://www.facebook.com/groups/SewingWithSusan/

Just Keep Sewing…

Susan

A Quilt Along, My Life

1-A-Day, 3″ Blocks –Double Hour Glass

 Double Hour Glass Block

I hope you had a good weekend.

It’s such a bizarre time.

Nothing is usual.

So thankful for my quilting friends & my quilting!

Something else I’m thankful for

is the sun shining into my sewing room!

Today we’ll make this cutie.

Had lots more fun going through my scrap basket!

 ~~~~~~~~~~~~~~~~~~~~~~~~~~~~~~~~~~~~

Cut:

  • 4 black sq’s. 1  1/2″
  • 1 center fabric sq. 1  1/2″
  • 4 half-square triangles 1  1/2″ unfinished with center fabric & color fabric


I like using Thangles when I need such small half-square triangles.

Use your favorite method.

Sew the squares into rows.

Press the seams away from the hst’s.

Sew the rows together.

I pressed the last seams open.

Taking out the few stitches in the seam allowances helps the little blocks press flatter.

How many will you make?

Show us your blocks at my Sewing With Susan FB Group.

We want to see your progress too!

https://www.facebook.com/groups/SewingWithSusan/

Just Keep Sewing…

Susan

A Quilt Along, My Life

1-A-Day, 3″ Blocks –Bright Hopes

 Bright Hopes Block

Today’s block(s) is Bright Hopes.

Had lots more fun going through my scrap basket!

 ~~~~~~~~~~~~~~~~~~~~~~~~~~~~~~~~~~~~

Cut:

  • 1  1/2″ sq. center fabric
  • 1 rec. 1  1/2″ x 2  1/2″ of 4 color fabrics

Sew a partial seam only

sewing the center sq. onto 1 of the rec’s.

Sew 1/2 – 3/4 of the seam.

Finger press seam toward rec.

Layer another rec. on top.

Sew that entire seam.

Press seam toward rec.

Layer another rec.

Sew seam then press toward rec.

Pin the 1st rec. out of the way.

Layer then sew the last rec.

Press.

Finish the first seam.

A pin will help keep things lined up.

Pretty cute, huh?

Of course I made 3 of these!

They’re super easy

& can use 5 (15) different Thimbleberries prints!

I think the backs of these blocks are just as pretty as the fronts.

We’re getting quite a stack of blocks for just 4 days.

Image what we’ll have after the crazy quarantine is over!


What do you think?

Do you like the variety so far?

Any block in particular you’d like me to feature?

Show us your blocks at my Sewing With Susan FB Group.

We want to see your progress too!

https://www.facebook.com/groups/SewingWithSusan/

Just Keep Sewing…

Susan

A Quilt Along, My Life

1-A-Day, 3″ Blocks –Tiny Tree

 Tiny Tree Block

I’ve been listening to 80’s Pop Radio on Pandora the past couple of weeks.

It just plays in the background.

A few days ago I chose our family’s theme song:

No need to watch, just listen to the refrain.

Can you relate???

Today’s block is Tiny Tree.


Had lots more fun going through my scrap basket!

 ~~~~~~~~~~~~~~~~~~~~~~~~~~~~~~~~~~~~

Cut:

  • 2 cream sq’s. 2″
  • 2 cream rec’s. 1 3/4″ x 2″
  • 1 green rec’s. 2″ x 3 1/2″
  • 1 black rec. 1″ x 2″

I used my “Lazy Susan” technique for the flying geese again.

See the spool block post here for instructions.

I pressed the seams toward the trunk.

I think it makes the trunk stand out.

Next, sew the tree to the trunk.

I pressed this seam upward &

clipped the few stitches in the seam to make it lie flatter.

You could make a whole forest of these in an hour!

Show us your blocks at my Sewing With Susan FB Group.

We want to see your progress too!

https://www.facebook.com/groups/SewingWithSusan/

Just Keep Sewing…

Susan

A Quilt Along, My Life

1-A-Day, 3″ Blocks –American Homes

 American Homes Block

How many squares in a box blocks did you make yesterday?

Having fun like I am?

Today’s block is American Homes

but I’m renaming mine to Goldilock’s houses.

You’ll see why I renamed it below.

Had lots more fun going through my scrap basket!

 ~~~~~~~~~~~~~~~~~~~~~~~~~~~~~~~~~~~~

Cut:

  • 1  1/2″ sq. baby house fabric
  • 1  1/2″ x 2  1/2″ rec. mama house fabric
  • 1  1/2″ x 3  1/2″ papa house fabric
  • 6 sq’s. 1″ background fabric
  • 1 sq. 1  1/2″ background fabric
  • 1  1/2″ x 2  1/2″ background rec.


Use “Lazy Susan’s” flying geese method

as described in the spool blocks

to make the top of each house.

Click here too see that post.

Press seams open or toward the triangles.

Sew the columns together to complete the block.

I made 2 blocks.

I was going to stop here, but trudged on.

I’m glad that I did!

Show us your blocks at my Sewing With Susan FB Group

https://www.facebook.com/groups/SewingWithSusan/

Just Keep Sewing…

Susan

A Quilt Along, My Life

1(or more…)-A-Day, 3″ Blocks — Squares In A Box

Squares In A Box Block Day

How many 3″ spool blocks did you make yesterday?

Since I’ve been getting asked

“how many blocks do I need to make?”

&

“how many days will we be making blocks?”

The answer is:

We will continue to make blocks

until I’ve used a piece of

EVERY Thimbleberries

fabric in this basket,


& in my cart!


Lol, not sure I’ll live that long.

The real answer is make as many as you want.

I have no idea what I’ll make with these blocks.

I just want to give us something fun & easy

to work on instead of watching TV or reading the news all day.

Sew & have fun!

 ~~~~~~~~~~~~~~~~~~~~~~~~~~~~~~~~~~~~

This is Squares in a Box.

Cut:

  • 2 rec’s. of outer fabric 1 1/2″ x 3 1/2″
  • 2 sq’s. of outer fabric 1 1/2″
  • 1 sq. of inner fabric 1 1/2″


& if you’re an overachiever,

cut a couple, a few or even 100 more!

Sew the inner sq. between the 2 outer sq’s.

Next sew the block together.

Voila!

Show us your blocks at my Sewing With Susan FB Group

https://www.facebook.com/groups/SewingWithSusan/

Just Keep Sewing…

Susan

My Life

Sewing Coronavirus CDC-compliant face masks for staff

If not now, eventually we will all affected by the Coronavirus either directly or indirectly.

3 of our children are healthcare workers working directly with patients every day;

our daughter a nurse practitioner,

her husband an RN

& our Daughter-in-law a physical therapist.

Let me tell you, more than ever this mom is praying for their & all of our safety!

So, last night when our nurse practitioner daughter sent me a link from the hospital that her husband works at asking for help with making masks & mentioned maybe I could maybe write on my blog to help get the word out, I said sure!

Here’s a link that I found from Deaconess Hospital with a very good (short) video that shows a woman actually making a mask, giving exact dimensions for fabric & elastic.

I had no elastic the right size, but fortunately my mom did!

Since my parents have been quarantined for nearly 2 weeks

I feel safe handling stuff from them.

Can you relate?

After watching the video last night I noticed these fabrics in my sewing room.

Recognize them?

They’re scraps from making my QAYG, Jellyroll Joyride quilt

samples for spring market this time last year.

Today I set to sewing masks while chatting

(on the phone) with a quilting friend!

Less than 2 hours later I had these:

I have more fabric & more elastic so I will make more tomorrow.

A local quilt shop, Patchwork Plus is a local drop off spot for them.

“Drop off at the shop on Wednesday or Thursday 11-3 each week.
You can also mail them to the shop at 62 E. Ferguson Ave, Wood River, IL 62095.
Please put them in a plastic bag.
DO NOT TAKE THEM TO THE HOSPITALS OR NURSING HOMES!”

If you can help, I’m sure there is need in your area also.

If you don’t have any masks in your household

you may want to make enough for your family too

just in case the need arises for use.

Please pray for the safety of our healthcare workers,

first responders & everyone helping in this dangerous time.

Thank you!

Just Keep Sewing…

Susan


A Quilt Along, My Life

1(or more…)-A-Day, 3″ Blocks –Spool

Spool Block Day

3″ blocks are quick,

easy,

fun

& don’t take a lot of fabric!

Yup!

I decided on my treasured Thimbleberries stash,

which ironically is still growing

(with the help of my friends & this isn’t all of it!)

although Lynette Jensen hasn’t designed any in several years.

Cut:

  • 2 black rec’s. 1 1/2″ x 3 1/2″
  • 6 cream sq’s. 1 1/2″
  • 1 awesome sq. 1 1/2″ notice I fussy cute mine ;)

Are you familiar with my “Lazy Susan” flying geese method?

Instead of drawing a line on the square,

I lay a ruler over the lined up square & rectangle

with the 1/4″ line corner to corner instead,

then cut off the corners.

I just noticed this morning that this Creative Grids ruler

is visibly able to align with both corners at once.

I typically use my 6″ Omnigrid ruler.

NOTE: This isn’t a typical flying geese block.

Typically you must do 1 corner at a time.

This gives me a place to align the scant 1/4″ seam.

Sew the 2 seams with scant 1/4″.

Press seams as sewn, then open for less bulk.

Sew awesome 1 1/2″ sq. between the 2 cream 1 1 2″ sq’s.

Press seams as sewn, then open.

Sew rows together.

Voila!

I like that word…

Then cut some more fabrics…

to make more…

Show us your blocks at my Sewing With Susan FB Group

https://www.facebook.com/groups/SewingWithSusan/

Just Keep Sewing…

Susan

A Quilt Along, My Life

Want To Sew 1-A-Day 3″ Blocks With Me?

During my 3 1/2″ hour commute to my studio this morning,

(OK, I was very much sidetracked when I started cleaning behind my computer that got pulled out yesterday to try & help my husband work from home. I then spent the next 3 1/2 hours pulling out furniture, vacuuming, dusting & cleaning every window inside & out!)

It was time, but I do not enjoy the task!

Lots of time for thinking though…

The idea came to me after I self imposed my own quarantine nearly 2 weeks ago.

Then in hearing from my friend, Chris over the weekend who’s sister-in-law had passed away from the virus,

I made a decision that I was going to help in my own way.

While busily praying,

binding

& sleeving

my new,

but no-longer-going-to-quilt-market quilts

these past few days,

I decided since a lot of you enjoyed our little 3″ blocks

from my 12 Days of Christmas quilt-along,

that more little 3″ blocks would be fun now too!

Everyone has fabric enough for 3″ blocks, right?

For now, gather your “collection”

& get it ready with Mary Ellen’s Best Press.

Working with little pieces is no big deal

when you press them with Best Press first!

Spring? Civil war? Batiks? Brights? Christmas? Scrappy?

Doesn’t matter!

Just use your favorites.

I’ve not decided yet myself… maybe Thimbleberries?

I will decide & I will get to work so you can start sewing!

I’ve already decided on the first block

and did some browsing here for more ideas.

Are you with me?

Want a little bit of sewing each day

to take your mind off of the things we cannot control?

Chop, chop, go make some decisions!

Just Keep Sewing…

Susan


My Life, Quarantine Quilting

Second Quarantine Quilting UFO Finish

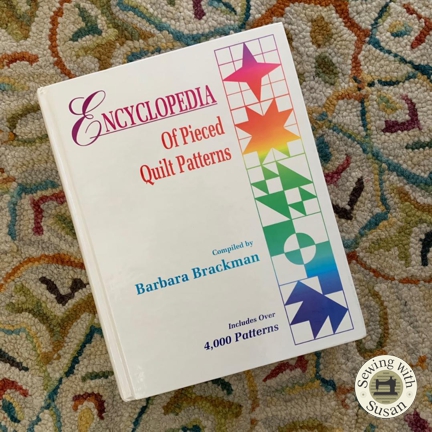
The second UFO that’s been on my list for almost a year…

Robin’s Wreaths,

a 5-part quilt designed by my good friend,

Robin Koehler of Nestlings By Robin.

It was featured in

AQ Magazine 2018-2019.

I had the 6 blocks complete pretty much on schedule

with the release of each of the magazines.

The tiny leaf templates were all cut out

& fused to the leaf fabric.

That’s where I stalled out when I got too busy with market prep this time last spring…

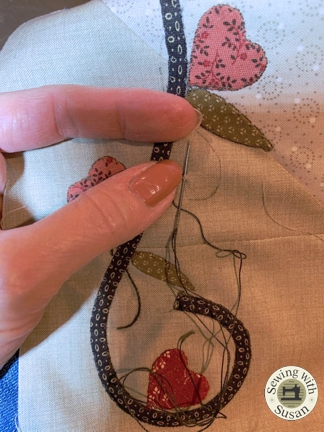
So this is where I began.

Trimming seam allowances & gluing.

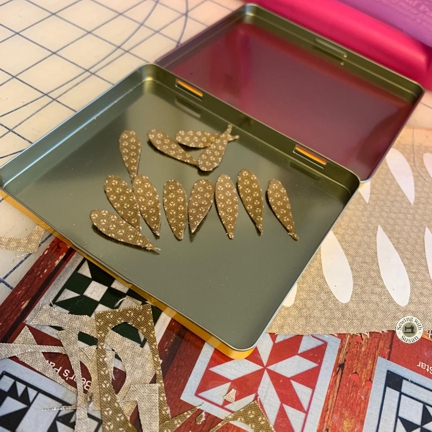
Starting with the smallest of leaves,

then the little bit larger, small leaves.

It’s my own fault!

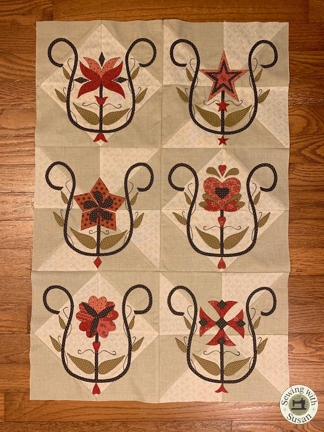
I thought it would be so cute made miniature.

I actually made the templates from the printed

size templates in the magazine instead of enlarging them 200%.

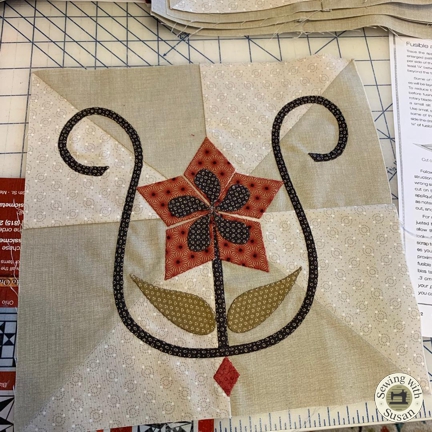
Next, to glue the tiny leaves to the 6 finished blocks.

An issue which came with making a smaller version of this quilt is the fact that I had to improvise parts of the design that were just too small to incorporate into this scale.

Some I turned bias strips into stitched vines & some I left off completely.

The blocks are still very full of applique!

Next, borders!

This was a great opportunity to use my new Cricut BrightPad.

Love this!

I’ve been using a very old & crude (but much loved)

version of a light box that my then college boyfriend

(now husband of 31 years)

made for me to use in my design classes.

Lots of little hearts were next.

Thanks goodness for my Apliquick tools!

These things are a life saver!

It took me all day,

but the borders were soon made

& ready for stitching;

applique by machine then embroidery by hand.

It was nice having some hand work to do while watching TV.

With top complete, it was time to contemplate how to quilt it.

I decided on a grid to complement the block background

so as not to overpower the tiny applique.

These blocks are only 5″ finished.

It doesn’t take much to fill them.

Then binding!

And voila!

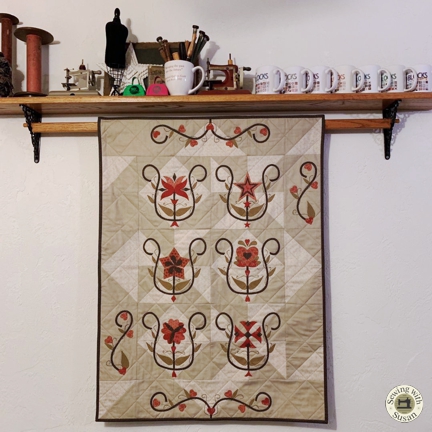
It now resides in a place of honor in our kitchen.

LOVE it!

Love that I could finish it in this crazy quarantine period.

What are you working on?

Please share your projects & progress on my Sewing With Susan FB group:

https://www.facebook.com/groups/SewingWithSusan/

Please stay home & stay safe!

Just Keep Sewing…

Susan